John Lehmann is award winning photojournalist with the Globe and Mail in Canada. John shares with Munetake Kayo what he carries while working, and why he carries certain items. John is an amazing photographer and a friend. I like how organized he is with all his photo and multimedia gear, which has motivated me to organize my gear better too.
Each time Apple releases a new product there is usually a collective groan from the faithful.
With the iMac, it was the lack of a floppy drive and serial ports. The iPad had no USB ports or simple way to move content from one device to another. The Macbook Pro ditched the optical drive years before the rest of the PC world would consider life with out DVDs.
Last spring landed one of the most controversial Apple products to come out of Jony Ive’s design studio—the 12-inch Macbook. With only one USB-C port—used for both charging and input, the head scratching and bitching tempered the coolness factor of what a revolutionary product this light, two-pound notebook really is.
I spent the better part of two months weighing the positives and negatives of whether to spend $1300.00 on what reviewers called an underpowered, port-lacking, retina screened gold-colored beauty. I was looking for a notebook, not to replace my trusted, but heavy 17-inch Macbook Pro I use at work, but a notebook, I could slip into my ThinkTank Retrospective 7 camera bag and have with me everywhere I go.
My newspaper is also moving to a digital first workflow–meaning that we are publishing first online before it shows up in the print newspaper. The pace is picking up and I need to be able to send as quickly as I can to meet the tighter deadlines.
As a photojournalist, I had reservations about whether the 1.1 GHz Intel Core M processor would be able to handle my Photo Mechanic/ Photoshop workflow. I searched online reviews and they were all really vague as if this little laptop could handle the stress. I decided to take the gamble and purchased the Macbook last week.
So far, I am really impressed with the performance. If you are doing a normal photojournalist’s workflow of ingesting into Photo Mechanic, editing and captioning the selected images, opening them in the Adobe raw converter and finally moving them into Photoshop for final corrections, then yes, this notebook will handle it just fine.
Pat Cason, dressed as the Bride of Frankenstein, makes her way along the course during the 5k Monster Dash + Kids’ Fun Run in Manito Park, Sunday, Oct. 25, 2015. Over 600 adults and children, many dressed in Halloween costumes, ran the 5k, or one of the shorter kids’ fun runs. The race was put on by Active4Youth – whose mission is to combat childhood obesity & juvenile delinquency through after-school sports programs. COLIN MULVANY colinm@spokesman.com
Last Sunday, I shot a Halloween Monster Dash fun run. I followed the above workflow and downloaded and edited 300 or so images into 14 color corrected captioned pictures. The Macbook never froze or slowed down, I was able to FTP the images back to the newspaper just like my 17-inch Macbook Pro. The screen is bright with tons of detail that I am not used to seeing on such a small notebook computer.
Looking south from the intersection of Glass Avenue and Washington Street, the trees of the Emerson/Garfield neighborhood are ablaze with fall color, Monday, Oct. 26, 2015, in Spokane, Wash. COLIN MULVANY colinm@spokesman.com
A few days later I was tasked with finding a feature picture in-between photo assignments. It was late in the day and I found a fall color picture of the tri-colored trees with the downtown buildings in the background. After taking the photo I sat in my car and opened up the Macbook and plugged in my Lexar card reader into a USB 3 to USB-C adaptor and quickly worked the image and sent it back to the newspaper via my cellphone hotspot and FTP. I found it much more comfortable to work on the small and light Macbook then the huge and heavy 17-inch Pro. A few minutes later I was off to my next assignment, with the Macbook tucked back safely my camera bag. For now I am happy with my the decision to go with the Macbook. The limitations are not for everyone. I will buck up and buy the dongles to make the one input port work for me. Other than that I like everything else about the computer. I am even getting used to the new thin keyboard. I believe days of heavy laptops are numbered and Apple is leading the way with the Macbook 12-inch.
My assignment was to cover a police officer’s funeral.
Ok. I think about how a funeral unfolds. I arrive at the high school gym an hour early and score a decent parking spot. I set up my Nikon D4 DSLR camera on the mezzanine level of a high school gym with a 200-400mm f/4 lens and a wireless mic to capture video of the speakers. I also shoot b-roll of the mourners and crowd shots. Now what?
This is what I faced as I formulated my plan to cover the funeral service of Coeur d’Alene Police Officer Greg Moore who was killed in the line of duty in May.
And this is where three local TV news stations covering the funeral and my newspaper produced video diverged. We had two still photojournalists, Dan Pelle and Kathy Plonka, covering the funeral. I decided ( at the last minute) my job was to find the gold coins from the speakers and then create a narrative spine to hang the still photos on. I also made sure to shoot video b-roll of the police car procession mixed with citizens lining the funeral route.
An hour after the event was over, I was staring at a blank timeline with a ton of raw video in my Final Cut Pro X browser waiting to be edited. I began to panic. How can I tell this story in a short amount of time, but still connect emotionally to what was happening? Where do I start?
It took me a few minutes, but my simple solution was to start with a music track. I headed over to Preminumbeat.com and purchased a simple piano-based track that had a slow beat. Once I laid the music down in the Final Cut Pro X timeline, it was just a matter of meshing the one speaker, who defined the communities response to the tragedy, with the still photos, which I edited the beat of the music. I realize this not the type of video story TV news could or would want to tell (stand ups and anchor tosses are the norm.) The newspaper benefited from also having a wonderfully fact-filled print story for online readers, but this video allowed them to feel the emotion of the event in ways the printed word can rarely do.
Video storytelling is a wide-open genre. I’ve learned over time there is no right or wrong way to approach a story. I just try to make sure to connect with the emotion of my subjects. If I do, I know my video story will be good as gold.
Sara Lavigne, right, and her mother, cancer patient Jana Lavigne, leave Deaconess Health and Education Center after witnessing a domestic shooting in the Rockwood Cancer Clinic, Tuesday, July 8, 2014, in Spokane, Wash. Initial reports indicate the gunman opened fire inside the clinic, killing his wife, then turned the weapon on himself. The wife reportedly worked at the clinic. Colin Mulvany/The Spokesman-Review
“EDITORS, TAKE THIS PHOTO DOWN NOW!” posted an online commenter after this image led our home page for most of the day.
Earlier, a police scanner call had come into the newsroom saying two people were shot in the Rockwood Cancer Treatment Center at Deaconess Hospital. I ran to my car and arrived at the scene a few minutes later.
Emergency personnel scurryed about; ambulances stacked up outside the building. I made as many overall scene shots as I could.
I spotted a TV cameraman interviewing two women in a car. As I walked up, S-R reporter Kip Hill joined me. With the TV interview completed, we tried to ask some questions about what happened and were meet by a panicked narrative of shots being fired, of fleeing, of disbelief of what had just occurred so close to them in another room. It was a one-minute interaction as a buildup of vehicles behind their car forcing them to move on. They quickly gave us their names and the passenger confirmed to me she was a cancer patient at the clinic.
I shot a dozen or so frames of the women. Soon after, the fire trucks and ambulances left and a press conference was called. It turned out to be a domestic murder-suicide. A man shot and killed his wife who worked in the cancer clinic. So why publish this dramatic photo?
Photojournalists sometimes take a lot of heat for the images they make. Capturing fleeting moments of life and people in my community is my job. Most days, my photography is mundane– an environmental portrait of an artist, a shot of a high school basketball game or a slice of life feature picture. Other days, photos, like this one, standout. They can make readers and viewers react negatively because of their shock value. Many times online commenters will use the word “sensationalism” when posting about a photo.
So why did we choose this one to publish? Because it best illustrates the shooting aftermath of what happened inside the clinic. It tells an emotional story without words– the panicked look on the driver’s face, her cancer patient mother in the passenger seat, distraught and uncomfortable. My other frames of police and firemen standing around could not illustrate what happened inside the building. So the editing choice: mundane or more storytelling. Storytelling wins every time, even if it makes you the reader feel someone else’s pain and discomfort.
If you want to learn to be a better video storyteller, check out Story Tellers: Tips Stories and Resources for video storytelling. It is geared for TV news shooters, but the fundamentals are there for all kinds of video stories. This week, Darren Durlach, a former TV news shooter, now with the Boston Globe, gives great tips for gather audio.
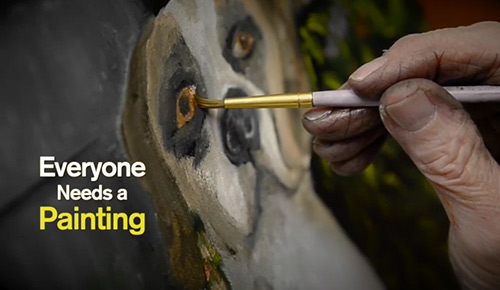
It’s not often a video story comes knocking at my door. A few weeks ago, Pat Adams, my next-door neighbor, came over to my house to ask me how she could get in contact with Dan Pelle, a co-worker of mine at The Spokesman-Review. Adams told me she had painted a picture of Pelle’s dog Koko, who died in a vicious pit bull attack last year, and wanted give the painting to him.
I learned Adams has been churning out dozens of oil paintings of people’s pets that have died, and that most of the painting recipients had never met her. When she told me she did the paintings free of charge, I knew I had a story.
I spent a few mornings shooting Adams as she painted. As you watch the video, take note of some of the production and editing techniques I used:
I start the story with a video title card with music. This short opener allows web viewers to adjust their audio. It also makes a great thumbnail for Vimeo, if that is where you upload to.
I open the video with Adams painting at her kitchen saying: “I love to paint…” I use a camera slider to add movement in the first two shots. It gives the video a cinematic feel and helps reveal my subject for the first time.
At 0.24 I introduce Adams with my opening narration. “For the past thirty years, artist Pat Adams has set up a painting easel and palette on her kitchen table…” Yes, I could have told this story without narration, but I don’t think the storytelling would have been as efficient. In this video, I only narrate in places where the story needs definition or a transition of time or place.
When I started shooting with my Nikon D4 DSLR–a great low-light camera–I didn’t think I needed to light Adam’s kitchen. But the cool window light mixed with the warm incandescent light made it tough to get a clean white balance. Thankfully, I had a light kit at my house next door, and a few minutes later, I had two quartz halogen lights set up to bounce off the white kitchen ceiling. The white balance improved dramatically with the added warmer, softer light.
Audio. I love using a wireless mic on subjects. The audio is clean and dynamically full compared to using just a shotgun mic. It has one other huge benefit—it allows the subject to be more natural without having a big microphone pointed at them from a foot away. I can be across the room shooting wide shots and still be getting wonderful soundbites to use later in the edit. Where the wireless mic paid off in this story is when Adams would talk to the painting. Those parts were emotional gold when I assembled this story later in Final Cut Pro X.
In the first minute of the video, Adams reveals, as a young mother of a Down syndrome child, she had a small stroke. Her cardiologist told her she had to paint to relieve the stress. This is the first gold coin in the video. I don’t reveal the true direction of the story yet because I want to pull the viewer in and surprise them with the next revealing moment.
At 1.06, I say: “Adams put her brush to canvas. At this point in the video I use a super-tight shot of her brush dabbing the canvas with paint. This is one of my favorite clips in the video. I shot it with a 60mm macro lens. It helps hold viewer interest in the story because I am showing them something they can’t normally see.
The interview. I waited to do the interview until the second time I shot Adams painting. This allowed me to ask better questions. I kept a mental list to things Adams told me during the first shoot, which then helped me formulate better questions to ask her in the formal interview.
The next big gold coin comes at 1.47. Adams says: “I think the first animal I painted was Sage…” This is where the first emotional tug in the story comes. It reveals what the story is really about, and hopefully, keeps the viewer engaged in where the story is going.
Music. I learned a valuable lesson about how to use music after I posted the video asking for feedback on a Final Cut Pro X forum site. Professional editor Jeff Bartsch gave me this advice:
“Big sloppy rule of thumb: in much doc/reality/verite TV, you’ll find that most cues of music run between 30-60 seconds. Anything longer runs the risk of saying the same thing too many times or getting old. At the moment, the piece is 6 minutes and has only 2 cues of music that are pretty much the same, though the piece has multiple sections of exposition and progression of thought.”
What Bartsch helped me understand was I needed to use music as a transitional element. As the scenes, or tone of the story changed, so too should the music. I added in three more music tracks, each to fit the different tones of the story. It was a huge improvement (Thanks Jeff.)
At 2.15, I start showing some of Adam’s animal paintings. I used an out of focus photo of a painting palette as a colorful background. I use a drop shadow on the paintings to set them off a bit from the background.
The one thing I kept telling myself as I shot Adams as she painted was to, “shoot wide, medium, tight, tight, tight.” The variety of the tight shots really made the editing job easier because I could use those shots as transitions between scenes.
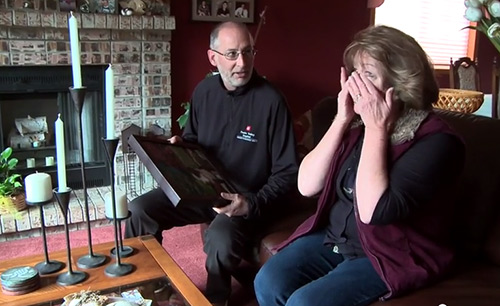
The next story gold coin comes at 3.07 when Adams says: “What’s the scariest thing in handing someone a painting”? I cut to Adams walking out of her kitchen with a dog painting and giving it to a young couple in the living room. Adams voice over continues to talk about her fear of rejection, but at the same time, the couple tells her they love and are amazed by her generous gift. This is where understanding the power of the edit—how you can weave different threads of narrative and have it all work together to advance the story–is so important.
At 4.00 I take Adams out of the house and into her car to deliver the painting to Dan Pelle. Other than knowing that she is bringing him a painting of his dog Koko, they had not met until he opens his door. I just told Dan I was going to be there and to just ignore me during their interaction.
I shot some driving scenes on the way, and then a shot of Adam’s pulling into the driveway. This is where it starts to get technically messy. I switched to a traditional video camera for these scenes, because in run-and-gun situations, I find a DSLR is too slow to focus and make auto balance corrections on the fly. And because my video camera has two channels of audio (shotgun on the camera and a wireless on Adams) it gave me backup audio if one of the audio channels failed.
My favorite edit comes as Adams exits her car and shuts the door. I straight cut directly to Pelle opening his front door and greeting Adams. In one simple edit, I cut a whole bunch of time out of getting Adams from her car to the front door. I think it works, but it is a bit jarring.
At 4.30, Adams is invited into the house. It is technically challenging to go from outside daylight to inside incandescent mixed light. I put the camera into full-auto mode and hoped for the best. As I headed into the house, the camera was recording Adams and the Pelle’s as they introduced themselves. I can’t really shoot any cut-aways to cover the weird transition of white balance and exposure shift. Later, as I was editing this scene, I added a still photograph of the dog painting to cover of some of bad color shift. I always strive for perfection, but sometimes it just out of reach.
The next gold coin is the interaction between Dan Pelle and Adams during the painting hand off. It is emotional (for her) and yet what Dan Pelle tells Adams is heartfelt.
So how to get out of this story? Ira Glass, producer of “This American Life” says that a good story has to have a moment of reflection to remind the viewer why it was worth spending their time watching your story. As I was reviewing my footage, I came across this audio gem: “Its wonderful to see them. It’s like having your pet back home. Everyone needs a painting,” said Adams. I knew this clip was going to be my ender, my moment of reflection in the story.
“Everyone needs a painting” has gotten a lot of positive feedback from viewers. “I’m bawling in front of my computer,” is one common comment on Facebook. Knowing that my edit instilled an emotional response, makes me feel confident I told a compelling story.
The more I do video production with my Nikon D4 DSLR, the more I have come to like how it handles in-camera audio with an external mic attached. One of the big issues with the first generation video-enabled cameras like the Canon 5D Mark II and the Nikon D3s was they had limited audio capabilities. Many producers felt the need to record separate audio into a recorder like a Zoom H4n and then sync it later in post. What a pain. It’s one of the reasons I put off switching from a traditional video camera to a DSLR.
With my Nikon D3s, I went the route of trying to use a JuicedLink audio interface to manage my audio. The unit bolted on to the base of my camera, which made it feel bulky. It had great features like dual XLR audio inputs, levels monitoring and a headphone jack, but the truth is, on that piece of equipment, I could never dial in a clean audio signal.
A big part of the problem was the way the D3s handled audio with only three levels settings—high, medium and low. The last time I used the camera with the JuicedLink, I had such a high noise floor (a low background hiss) in my interview audio that I just left it on the shelf after that. Soon after, I upgraded to the Nikon D4 and have found I could generate low-noise audio, especially with a wireless mic, all without all the add-on accessories.
I like using a DSLR to shoot formal interviews. The shallow depth-of-field makes the subject look great. I use my trusted Sennheiser G2 wireless mic for my audio. Be advised, out of the box the gain on these mics are set really high. The first time used it, I had such distorted audio that it ruined the video story I produced for the newspaper. I quickly learned how to turn down the levels and make them work with my Sony Z1u video camera.
When I first used a wireless mic with My Nikon D4 (plugged directly into the camera’s mic jack,) I found the same high noise floor that my JuicedLink produced. After fooling around with the settings I came to this conclusion: I had to turn the levels on the mic back up and turn the camera audio levels way down. With the right balance (the mic sending the clean signal, which I assume overpowers the camera’s weak pre-amps), I now get quality audio without a lot noise-floor hiss.
Is my camera audio as good as recording separately to a Zoom H4n? I’d say depends on what you are doing with the video. If its going to be broadcast on TV, or destined for the big screen, then maybe not. But, if you are producing for the Web like I am, I’d say it’s more than good enough.
You can hear an example of what my wireless Nikon D4 audio sounds like in the interview and voiceover audio in this video I produced for a speech therapy clinic:
Here are my settings:
On my Nikon D4 (the same as on the Nikon D800,) I set the camera on manual and dialed the camera audio down to number 4 level.
On the Sennheiser receiver pack (the one that connects to the camera) hit the “Set” button then toggle the left selection button until you get to “AF Out.” Hit “Set” again and toggle the left arrow until you see -12 Db. Hit “Set” again.
Next on the transmitter pack (the one connected to the lav mic) hit “Set” then toggle to “Sensit” and hit “Set” again. Toggle until you get -06 Db. Hit “Set” again.
Now do a test. Watch your in-camera levels. If they are too low, bump up your audio level to “5,” but no more. If they are still too low go back into the mic pack and set the AF Out level to -6 Db.
Just remember that there is no phantom power with DSLRs. You need battery power from the mic for it to work properly. I sometimes put my big Sennheiser ME-60 shotgun mic on top of camera and it works like a charm with very low noise. Just make sure you have a fresh battery in mic and that it is turned on. If you don’t, you won’t record any audio.
One of the great things about the new generation DSLR’s is that they have headphone jacks to monitor your audio. Use it, or you’ll regret it later (trust me on this one.)
It happened so fast. The change. One day, photojournalists were just doing their thing. Shooting daily photos for their newspapers. Maybe even an odd photo story or two. A lucky day was getting a page or a double truck on Sunday to showcase all their hard work.
Video at newspapers was out there on the fringes. A few staffers braved the online world and embraced a new way to tell a visual story. Except this time, it was on the World Wide Web. No space restrictions here. Most traditional still shooters shrugged their shoulders and continued on with the status quo. Video cameras were for “TV types,” they said.
Then the layoffs hit hard. In 2009 and onwards, photo departments at many newspapers were gutted. Hundreds of staff photographers were tossed onto the streets to fend for themselves. To freelance.
In the midst of all this chaos, a new type of still camera was quietly released by Canon. The 5D Mark II had a little secret– it could shoot kick-ass HD video. A few brave photojournalists used the new technology to produce stunning imagery. Images unlike anything ever seen in the video camera world. Shallow depth-of-field shots and cinematic looks that mimicked film dropped many jaws along the way. The smart ones ran with it. Reinvented themselves and in doing so, reinvented the genre of documentary filmmaking. Overnight the doc film industry changed. Shooting with Film stock was done. Former still photojournalists, once resistant to shooting video, now embraced it.
The commercial still photography market tanked as a “billion of photojournalists” raised their iPhones and posted their snaps on Flickr.
Because the DSLR camera was familiar, still photojournalists could buy in without judgment. The taint of video, hidden in a tiny package of a pro DSLR camera gave courage to those that once scoffed at the idea. It did not matter that the DSLR was much harder to shoot with than a traditional video camera. What did they know? They had never shot with a Sony or Panasonic video camera with built-in stabilization and pro audio inputs.
The aftermarket kicked in with a plethora of accessories to make the 5D Mark II easier to focus and improve the bad audio the camera outputted.
Soon the former photojournalists were now calling themselves filmmakers. The old ideas of us (still) vs. them (TV) dissipated. “Us” became “them,” but in a different way.
Video storytelling changed. The entry point into the documentary film world flattened. An army of new filmmakers, not confined by the limitations and cost of film, were unleashed. Stories, some short, some long (most too long,) gave rise to publishing platforms like YouTube and Vimeo. No longer did you need a TV to showcase your vision. Shoot and edit your story yourself, then post it to the Web. Maybe even enter a film festival or two.
Former photojournalists, the ones newspapers turned their backs on, were the most creative with the new DSLR video medium. They brought a keen sense of composition, moment and storytelling to the table. But sometimes that was not enough. They needed to understand that great imagery did not a great story make. Each failure was a learning opportunity.
The unfortunate ones were the Nikon shooters. The Nikon D90 was the first DSLR to have video capabilities. But Nikon took a nap after that release. Canon became the de facto standard for DSLR video. The release of the Nikon D800 and D4 played catch up and now a lost generation of Nikon users are joining the fray of filmmaking.
I sit here now stewing, one of the first still photojournalists that embraced digital video storytelling at a newspaper. I was a change agent; embracing the idea that video was an important path to enhancing our online content. In those early days of 2004, our website was mostly text-based with a few postage stamp-sized photos sprinkled about. I evangelized, I shared, and I taught video sequencing to anyone who wanted to learn. I produced hundreds of video and multimedia stories. I even survived 11 rounds of layoffs at my newspaper. But now I feel like the old man talking about the good old days. Many of my photojournalists friends who left newspapers unwillingly are doing incredible documentary video stories now.
Video storytelling is hard. It takes commitment to keep learning. To keep pushing the boundaries of what is possible with the tools available.
In the blink of an eye, things change. It comes down to how you respond to that change. Give up and you stagnate. Embrace and you risk failure. Fear is the great equalizer. I keep telling myself “no fear, no fear.”
I really love video storytelling. Though now I feel the cool kids have taken the torch and somehow passed me by. I tell myself I still have knowledge and experience on my side.
Inside me is a storytelling machine waiting to be unleashed. My Nikon D4 beckons. The world is full of stories. The only one that keeps me from telling them is fear. No fear. No fear. No fear.
As I was making some final edits to a 10-minute long video project, an ad for the new Hawaiki AutoGrade color correction plug-in for Final Cut Pro X (Through Noise Industries FXFactory for $29.00) popped up in my Facebook feed. Normally, I just ignore these FB ads, but this one received my full attention. I was just about ready to do the final color correction on my project and I was not thrilled with having to use the limited color correction tools in FCPX (yes I’m pretty creeped out that Facebook knew what I was about to do.)
I love editing video stories in FCPX, but the one thing I gnash my teeth over is the funky way the program color grades video. Yes, it gets the job done for most projects, but it is not intuitive and has many feature limitations compared to other editing programs like Adobe Premiere.
The one feature I miss the most from my days working with the Final Cut Pro 7’s three-way color corrector was the white eyedropper. Look for something in a video clip that was white with a colorcast and click it. Instant cast remover. Many times that is all the color correction I would need to do. It worked best for tight deadlines where I needed to post a news video quickly.
With AutoGrade, the eyedropper returns to FCPX as well as a slew of other features that will make color correcting your video a breeze.
Learning how to use the plug-in took about as much time as watching the excellent provided video tutorial. Once I got rolling, I color corrected all my clips, about 50 in all, in about two hours. My workflow went like this:
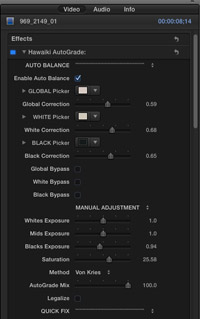
In the effects browser, I clicked the global adjustment picker and chose something neutral in my photo, and then I did the same with the white and black pickers. When done, I turned on “ Enabled Auto Balance” to show the correction. What’s really sweet is that each of the pickers has a slider that allows you to dial back an adjustment. This made fine-tuning simple and fast.
With my video scope set to Waveform/Luma I set my contrast of each clip. In “Manual Adjustment” I would start with my black exposure and pull it down so that the waveform kissed the bottom of the scale. I did the same with the “Whites Exposure” but this time I pulled the slider until the waveform touched the top of the scale. If needed, I would also tweak the “Mids” slider. Finally, a bump in saturation and maybe a fine adjustment with the cool/warm slider and I was done.
I found with this plug-in, I never needed to use Final Cut Pro X’s color corrector. The only draw back I found is there is more clicking with a plug-in. You also have to drag the filter onto each clip so that it loads into the effects browser. Still, the program is feature rich and really enhances FCPX color correction limitations. Until Apple makes an upgrade to the its color correction tools, Hawaiki AutoGrade is a perfect alternative.
The cries were fierce and seething. What did Apple do to my Final Cut Pro? It has been a little over two years since Apple software engineers upended the video-editing universe with the release of an “all new” Final Cut Pro X version of the proverbial video-editing program. Not long after the initial discussions as to whether it is called “X” or “Ten” subsided, did the bitchin’ and moaning among the ranks start.
Me? Well, I just dove in with gusto. Unfortunately, many fine editors made one big mistake. They tried to use the program without investing the time to learn how to use the new features—many of which were either a totally new way to edit (magnetic timeline) or ran counter to the way they worked in FCP 7 (dual viewers, bins etc.) They complained. Then they complained some more. Change was tough, especially for editors that lived in the old FCP paradigm since version 1.0
Before I even tried to edit my first project, my first stop was IzzyVideo’s excellent free FCPX video tutorials. I watched each several times until I began to grasp all the new concepts–connected clips, skimming, magnetic and secondary timelines, keywording and so on . I made sure I knew what each button in the interface did.
My first story edit went off without much fanfare. Still, I wasn’t totally convinced FCPX was better than my beloved FCP 7. The magnetic timeline drove me nuts, the single view monitor was strange and all that skimming took some time to get used to. I soldiered on and by the end of my third or fourth project, I started to jell with the program. Having to edit something in FCP7 now felt foreign. I kept wanting to skim clips in the browser.
My foray into FCPX was not without a hiccup that almost gave me a heart attack. Since its release, Apple has moved quickly to restore some of the lost features in the previous version. Multi-cam editing, XML export and dual viewers to name a few. But with all this updating, some versions became show-stopping unstable. Discussion boards were full of “FCPX didn’t save my project and now it is gone” type posts, which drove many editors over to the Adobe Premiere or Avid camps for good.
I was just completing a week-long editing project in version 10.05 when I started to trim a black slug at the tail end of my video. All of a sudden, poof, my entire project timeline turned gray. All the clips just vanished. A trip to the Apple discussion boards turned up many angry folks in the same boat as me. In typical Apple fashion, they shrugged their shoulders with silence and it took a user to figure out a convoluted solution to restore corrupted projects.
It made me realize at the time how much more FCPX needed to germinate before it was ready for real world work. That was a year ago and things seem to have smoothed out. My editing speed has accelerated dramatically the more I use FCPX. I feel much more comfortable and trusting of the program. I taught a video storytelling and production class at a community college and I found the students learned the basics much faster than they did in Final Cut Express.
So for now, Adobe Premiere sits in my applications folder unused. I have chosen FCPX as my video editing program. I continue to suck up as much information on how to use the program as I can. Lynda.com has really stepped up and provided some of the best FCPX tutorials around. If you invest the time, I believe you will become much more comfortable with FCPX. It truly is video editing reimagined. I look forward to what future upgrades bring.